I’ve been working on implementing Windows 10 at a company.
They wanted to import a photo of all the users to the Active Directory, and have all the other systems pull the pictures from it. I primarily focused on Windows clients, Lync and SharePoint.
Goal
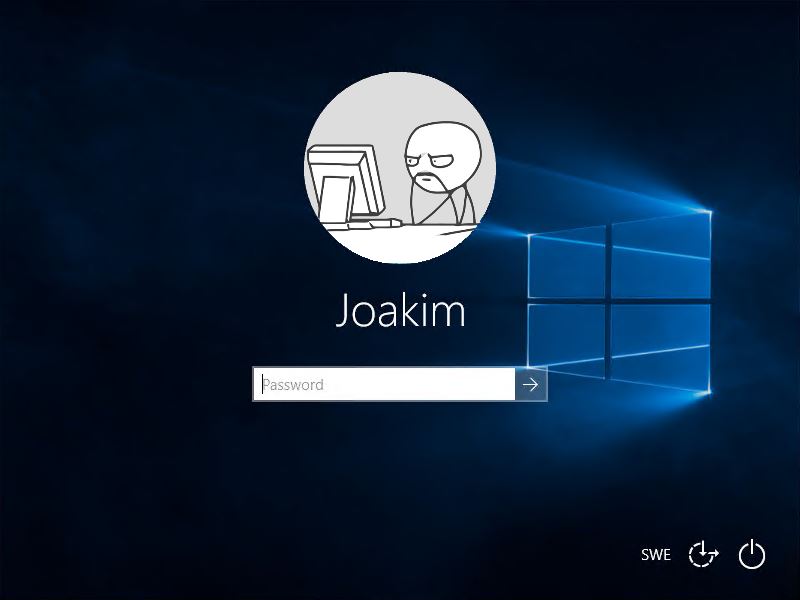
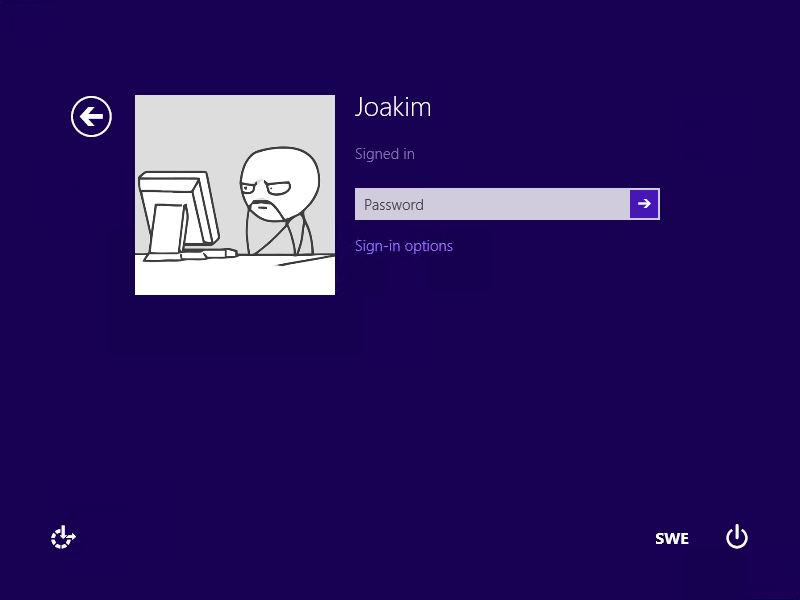
Our goal is to have Windows 8 and 10 clients pull the pictures from Active Directory to the users local profiles.
1. Importing the pictures to Active Directory
Now there are several approaches for this. Getting the pictures into AD I prefer using PowerShell.
If you’re more into GUI style I can recommend this AD Photo Edit.
2. Create the required scripts
You need a (startup) script to download the data from Active Directory and convert them to JPEG-files.
The script then proceeds to set these images as your local users profile picture/tile.
The PowerShell-script I’m using was originally written by Jordan. I modified it for better functionality and to make it work better with Windows 10.
<#
.SYNOPSIS
Set-ADPicture.ps1
Written by Joakim at Jocha AB, http://jocha.se
.DESCRIPTION
Version 1.3 - Updated 2016-02-13
This script downloads and sets the Active Directory profile photograph and sets it as your profile picture in Windows.
Remember to create a defaultuser.jpg in \\domain\netlogon\

2016-02-13 : Slightly adjusted.
2015-11-12 : Added all picture sizes for Windows 10 compatibility.
#>

[CmdletBinding(SupportsShouldProcess=$true)]Param()
function Test-Null($InputObject) { return !([bool]$InputObject) }

# Get sid and photo for current user
$user = ([ADSISearcher]"(&(objectCategory=User)(SAMAccountName=$env:username))").FindOne().Properties
$user_photo = $user.thumbnailphoto
$user_sid = [System.Security.Principal.WindowsIdentity]::GetCurrent().User.Value

# Continue if an image was returned
If ((Test-Null $user_photo) -eq $false) {
    Write-Verbose "Photo exists in Active Directory."
}
# If no image was found in profile, use one from network share.
Else {
    Write-Verbose "No photo found in Active Directory for $env:username, using the default image instead"
    $user_photo = [byte[]](Get-Content "\\$env:USERDNSDOMAIN\NETLOGON\defaultuser.jpg" -Encoding byte)
}

# Set up image sizes and base path
$image_sizes = @(32, 40, 48, 96, 192, 200, 240, 448)
$image_mask = "Image{0}.jpg"
$image_base = "C:\ProgramData\AccountPictures"

# Set up registry
$reg_base = "HKLM:\SOFTWARE\Microsoft\Windows\CurrentVersion\AccountPicture\Users\{0}"
$reg_key = [string]::format($reg_base, $user_sid)
$reg_value_mask = "Image{0}"
If ((Test-Path -Path $reg_key) -eq $false) { New-Item -Path $reg_key }

# Save images, set reg keys
Try {
    ForEach ($size in $image_sizes) {
        # Create hidden directory, if it doesn't exist
        $dir = $image_base + "\" + $user_sid
        If ((Test-Path -Path $dir) -eq $false) { $(mkdir $dir).Attributes = "Hidden" }

        # Save photo to disk, overwrite existing files
        $file_name = ([string]::format($image_mask, $size))
        $path = $dir + "\" + $file_name
        Write-Verbose "  saving: $file_name"
        $user_photo | Set-Content -Path $path -Encoding Byte -Force

        # Save the path in registry, overwrite existing entries
        $name = [string]::format($reg_value_mask, $size)
        $value = New-ItemProperty -Path $reg_key -Name $name -Value $path -Force
    }
}
Catch {
    Write-Error "Cannot update profile picture for $env:username."
    Write-Error "Check prompt elevation and permissions to files/registry."
}
To make this script run hidden I resolved to creating a VBs wrapper that would silently execute the script
'
' Title:  Set-ADPicture.vbs
' Author: Joakim at Jocha AB, http://jocha.se
' Modified: 2016-02-13
'
On Error Resume Next
command = "powershell.exe -Noninteractive -ExecutionPolicy Bypass -Noprofile -File \\domain.local\NETLOGON\Set-ADPicture.ps1"
set shell = CreateObject("WScript.Shell")
shell.Run command,0
Now put both these scripts in your NETLOGON-folder (ie. \\domain.local\NETLOGON).
3. Setting up the GPO
Open the Group Policy Management Console and create a new GPO. Lets call it “Pictures”.
Edit it and go to
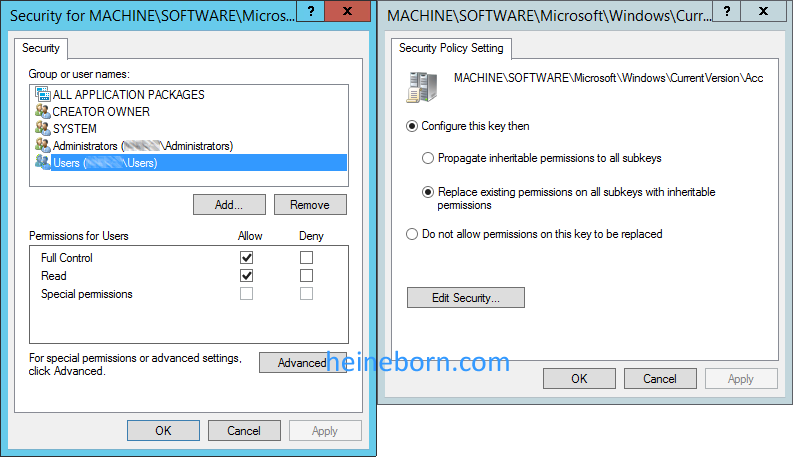
Computer Configuration > Policies > Windows Settings > Security Settings > Registry
Right Click on Registry and select Add Key. Then Add the Key:
MACHINE\SOFTWARE\Microsoft\Windows\CurrentVersion\AccountPicture\Users
Give Full Permission on this key (and sub keys) to <Domain>\Users.
Also make sure you have selected Replace Existing permission on all sub keys with inheritable permissions. Otherwise the script will not be able to update the necessary registry values.
4. Setting up the Task schedule
To run the function there are a couple of different approaches. You could either execute it from the “Logon Scripts” function in a Group policy or via Task Scheduler for example. Since you probably know how to set up a logon script, I’ll demo how to set up a scheduled job…
In the same Group Policy object as above, go to:
User Configuration > Preferences > Control Panel Settings > Scheduled Tasks
Right Click and select New Sheduled Task (At lest Windows 7) option.
Under the General tab Set Name as: Set-ADPicture
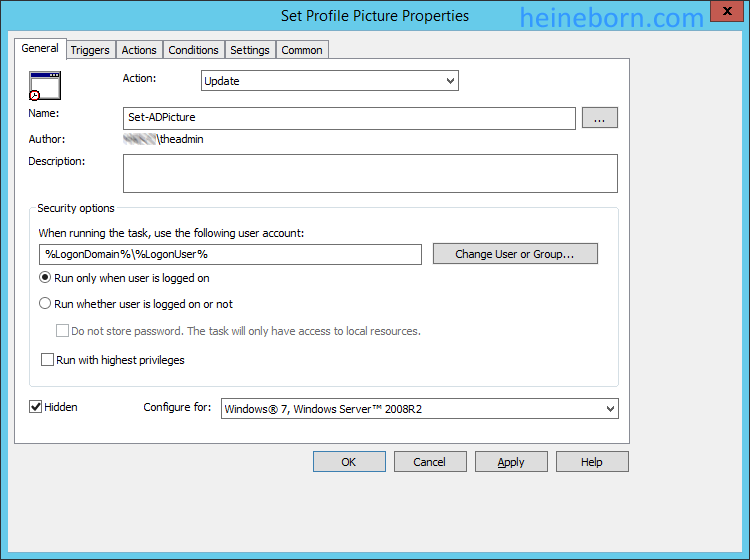
Under the General tab, set name to: Set-ADPicture

Under the Triggers tab, create a new trigger and select Begin the task: At Login, Any User
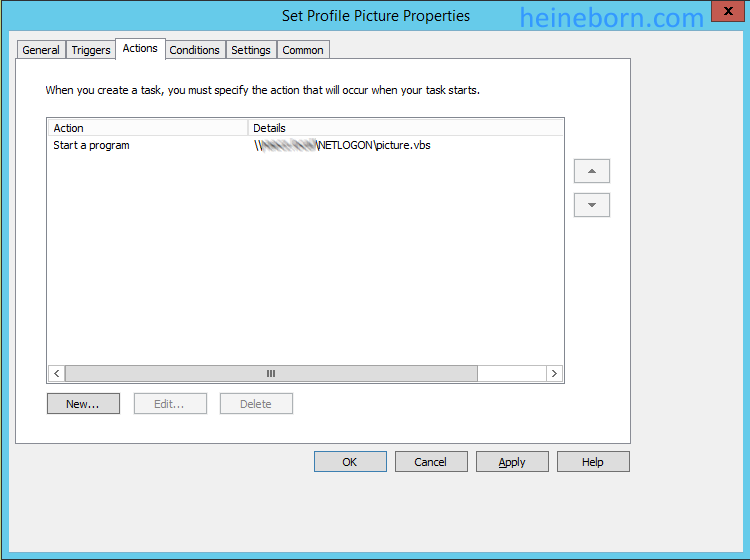
Under the Actions tab:
Create New Action Select Action “Start Program”.
From Program Script Option.
Select the VBs-script from NETLOGON.

Under the Conditions tab:
I prefer to enable Start only if the following network connection in available to make sure it does not waste resources if disconnected from the network.
5. Target the GPO
All the settings are now set. Go back to the Group Policy console and create your target links to the proper OUs.
Please let me know if I’ve missed something or if its not working for you.
Really wish this would work for me, but it does not. Here's the output I get when I debug the PS script on a local machine.
PS Microsoft.PowerShell.Core\FileSystem::\\vop-dc\netlogon> \\vop-dc\netlogon\Set-ADPicture.ps1
New-Item : Requested registry access is not allowed.
At \\vop-dc\netlogon\Set-ADPicture.ps1:24 char:50
+ … f ((Test-Path -Path $reg_key) -eq $false) { New-Item -Path $reg_key }
+ ~~~~~~~~~~~~~~~~~~~~~~~
+ CategoryInfo : PermissionDenied: (HKEY_LOCAL_MACH…ntPicture\Users:String) [New-Item], SecurityException
+ FullyQualifiedErrorId : System.Security.SecurityException,Microsoft.PowerShell.Commands.NewItemCommand
New-ItemProperty : Cannot find path
'HKLM:\SOFTWARE\Microsoft\Windows\CurrentVersion\AccountPicture\Users\S-1-5-21-1178081399-657988341-2141916652-10068' because it
does not exist.
At \\vop-dc\netlogon\Set-ADPicture.ps1:41 char:18
+ … $value = New-ItemProperty -Path $reg_key -Name $name -Value $path …
+ ~~~~~~~~~~~~~~~~~~~~~~~~~~~~~~~~~~~~~~~~~~~~~~~~~~~~~~~~~
+ CategoryInfo : ObjectNotFound: (HKLM:\SOFTWARE\…141916652-10068:String) [New-ItemProperty], ItemNotFoundException
+ FullyQualifiedErrorId : PathNotFound,Microsoft.PowerShell.Commands.NewItemPropertyCommand
PS Microsoft.PowerShell.Core\FileSystem::\\vop-dc\netlogon>
Hi Michael,
Seems like the permission changes for the registry have not been applied.
Please verify that they're correct.
Best regards,
Joakim
Hi, I have the same problem as Michael. I have created the GPO policy to modify the permissions in registry values, but the policy doesn't apply because (is written) there privileges are not enough. There is a solution about this issue? I use windows 10 clients and windows 2016 as a server, with the last security fix. Thank you!
Hi Christian,
Did you set it to replace all permissions?
Best regards,
Joakim
Hello, I have followed the instructions and finally got the profile picture to update. However while the picture is set and can be seen in the settings and the Start Menu it will not show during log in. I have the latest update of Windows 10 1807.
*1803
I'm also running 1803, I'll do some testing and get back to you.
Best regards,
Joakim
I too would be interested in the fix for 1803
Would you mind adding license terms? In the USA the default is "all rights reserved", even if you don't put a copyright notice on it, so it's illegal for us to use this script without your explicit permission.
This script used to work for me, but now I'm seeing this message on the workstations:
Set-Content : Access to the path
'C:\ProgramData\AccountPictures\S-1-5-21-1221301940-866318022-3202320560-1576\Image448.jpg' is denied.
At \\sclhsa.org\NETLOGON\ADPhoto\Set-ADPicture.ps1:58 char:23
+ $user_photo | Set-Content -Path $path -Encoding Byte -Force
+ ~~~~~~~~~~~~~~~~~~~~~~~~~~~~~~~~~~~~~~~~~~~~~
+ CategoryInfo : PermissionDenied: (C:\ProgramData\…76\Image448.jpg:String) [Set-Content], Unauthorized
AccessException
+ FullyQualifiedErrorId : GetContentWriterUnauthorizedAccessError,Microsoft.PowerShell.Commands.SetContentCommand
This script used to work but now I see this error on my workstations:
Set-Content : Access to the path
'C:\ProgramData\AccountPictures\S-1-5-21-1221301940-866318022-3202320560-1576\Image448.jpg' is denied.
At \\sclhsa.org\NETLOGON\ADPhoto\Set-ADPicture.ps1:58 char:23
+ $user_photo | Set-Content -Path $path -Encoding Byte -Force
+ ~~~~~~~~~~~~~~~~~~~~~~~~~~~~~~~~~~~~~~~~~~~~~
+ CategoryInfo : PermissionDenied: (C:\ProgramData\…76\Image448.jpg:String) [Set-Content], Unauthorized
AccessException
+ FullyQualifiedErrorId : GetContentWriterUnauthorizedAccessError,Microsoft.PowerShell.Commands.SetContentCommand
Hello,
i have the problem that if the PC is locked, the user picture ratio is wrong/bad. Afterwards in the User Account Settings of the User, the Picture looks normal.
Anybody the same Problem, or Idea ?
Whats is the perfect resolution for today enviroments ?
Regards
-Mark
Sorry, but this issue not working. I have all of that: user permissions for registry folder (well done, really no problems!), and all pictures succefully generated and placed in needed folders (and no problems with permissions and locations), and power shell script working without errors.
In user session I can open regedit, right key, copy full value and paste to explorer and – open picture. No problem. Absolutely.
And… no user picture at logon screen ))) Seems like Windows just ignoring registry record.
Tested in Windows 10 1703 and 1806, AD domain, GPO (logoff script), etc.
If you'll find solution, I would like to be subscribed to this topic )
It is working also well if you use the scripts User-GPO (Windows Settings-> Scripts -> Logon -> Powershell scripts) and save the PS Script in the given GPO-Script folder…